How to
From Manual to Magical
Unleashing the Power of Automated Data Workflows with Mesoica
Do you find yourself or your team constantly swamped with a deluge of emails containing unstructured data? Excel spreadsheets, PDFs, CSV files, images - you name it, and it probably lands in your (shared) inbox. If you're like many of us, you've tried to tackle this issue head-on, crafting macros and scripts in an effort to extract and validate data. While these solutions may work, they often end up being time-consuming, tedious and error prone.
But... there's a smarter way to manage your data workflow.
Say hello to Power Automate, a Microsoft product designed to streamline and automate your everyday tasks and complex business processes. Coupled with our very own Mesoica Data Quality Platform, you can not only automate data extraction but also perform robust data quality checks straight out of the box!
In this post, we're going to guide you through the process of connecting your mailbox to Power Automate and then to the Mesoica platform. By the end of this tutorial, you'll be able to turn your manual, time-consuming data processing workflows into efficient, automated data quality pipelines. Stick with us, and let's dive in!
What is Power Automate?
Before we dive into the how-to, let's take a moment to understand what Power Automate is and why it's such a powerful tool for data management.
Power Automate, formerly known as Microsoft Flow, is a cloud-based service that empowers users to create and automate workflows across multiple applications and services. It's designed to improve productivity, whether you're automating business processes, setting up alerts and push notifications, or moving and managing data between different sources.
What sets Power Automate apart is its user-friendly interface that doesn't require extensive coding knowledge. With its intuitive visual design, you can easily set up automation workflows, or "flows", by simply picking and connecting the right 'triggers' and 'actions'. A 'trigger' is an event that starts a flow (like receiving an email), while an 'action' is what follows the trigger (like saving an email attachment to a specific folder).
Moreover, Power Automate boasts a library of pre-built templates and connectors for over 300 popular apps and services. This means you can automate tasks not only within the Microsoft ecosystem (think Outlook, Excel, SharePoint), but also with many third-party services, including our Mesoica Data Quality Platform!
What is Mesoica? Introducing the Mesoica Data Quality Platform
Now that you're familiar with Power Automate, let's introduce another key player in our data management journey: the Mesoica Data Quality Platform.
Mesoica is designed to streamline your data quality processes. We all know that manual data quality processes can be time-consuming, messy, and prone to errors. But with Mesoica, you can automate the ingestion of unstructured data and continuously monitor your data for quality issues. This proactive approach allows you to identify and address issues before they morph into bigger problems.
At the heart of our platform is a mission to simplify and optimize data processes, helping you unlock the full potential of your data. With Mesoica, you can gain actionable insights, make informed decisions, and achieve data-driven success with confidence and ease.
In the next section, we'll show you how to connect your mailbox to Mesoica through Power Automate, bringing the full power of automated data quality checks to your inbox!
Setting Up Your Automated Data Workflow: A Step-By-Step Guide
Now that you're familiar with Power Automate and Mesoica, it's time to get your hands dirty and set up your automated data workflow. Don't worry, we'll guide you through each step. Let's get started!
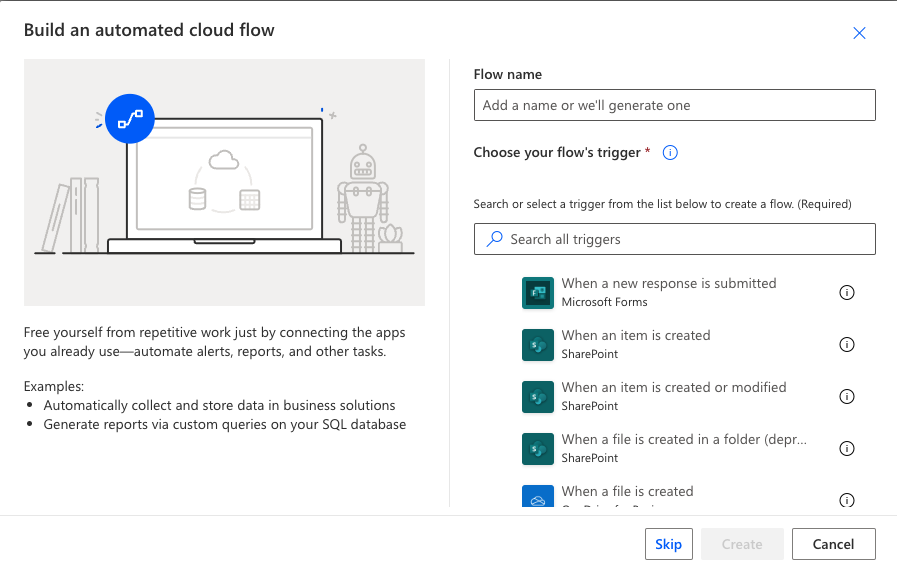
Create a New Flow: Open Power Automate and create a new flow. Start from blank, and select Automated cloud flow. Give your flow a name and click Skip or Create.
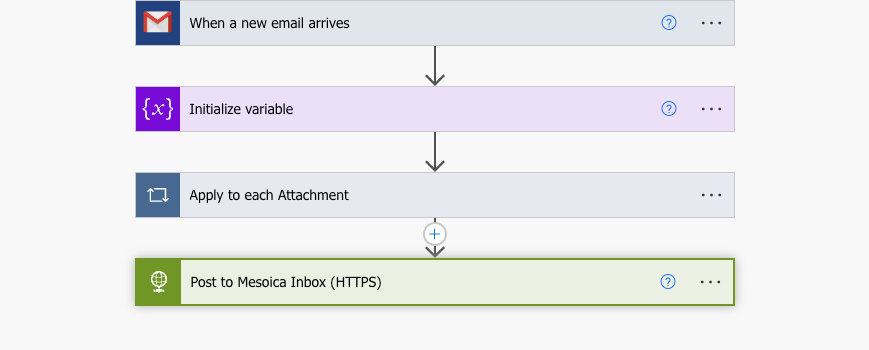
Set up the Trigger: Now, you'll need to select a trigger for your workflow. For the purpose of this tutorial, we'll be using the Gmail version of the When a new email arrives trigger. If you haven't connected your Gmail account yet, you'll need to do so first (Power Automate will guide you through this). This works for Office 365 Outlook or Outlook.com accounts as well.

Make sure Has Attachments and Include Attachments have been set to Yes. There's loads of other customization to be applied here, for example the trigger could fire only on emails have specific keywords in the subject line or are from specific senders.
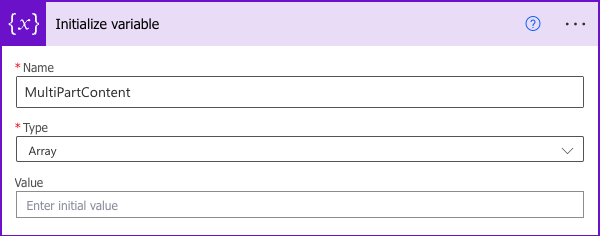
Prepare for Data Collection: As we're going to post to the API as multipart/form-data, we'll need to collect information on the email attachments in a variable. Initialize the variable in the next step.
Iterate Over Attachments: The next step involves iterating over the attachments in the email and creating an object for each attachment. This object will go into the HTTP request body. This step consists of two parts:
-
Parsing the Attachments JSON
-
Appending a JSON string containing attachment data into the MultiPartContent variable
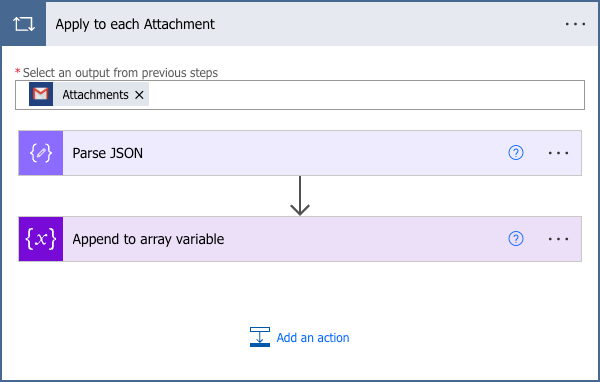
Parse JSON for Attachments: For each attachment, it's practical to parse the JSON object to easily access the attachment properties. Here's what the schema for the JSON looks like:
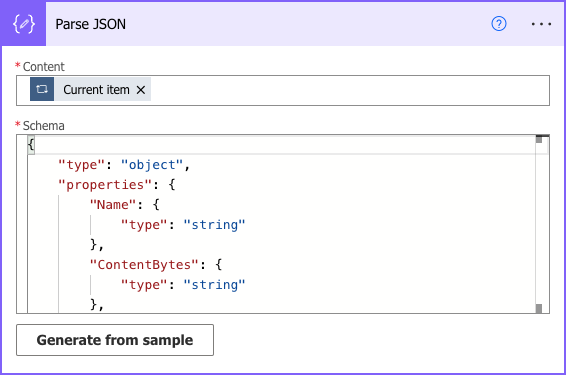
Here's the JSON code to use:
{
  "type": "object",
  "properties": {
    "Name": {
      "type": "string"
    },
    "ContentBytes": {
      "type": "string"
    },
    "ContentType": {
      "type": "string"
    },
    "ContentId": {
      "type": "string"
    },
    "Size": {
      "type": "integer"
    }
  }
}
Append Attachment Objects: Once you've parsed the JSON for each attachment, you'll need to construct an object for each one and append to MultiPartContent variable:

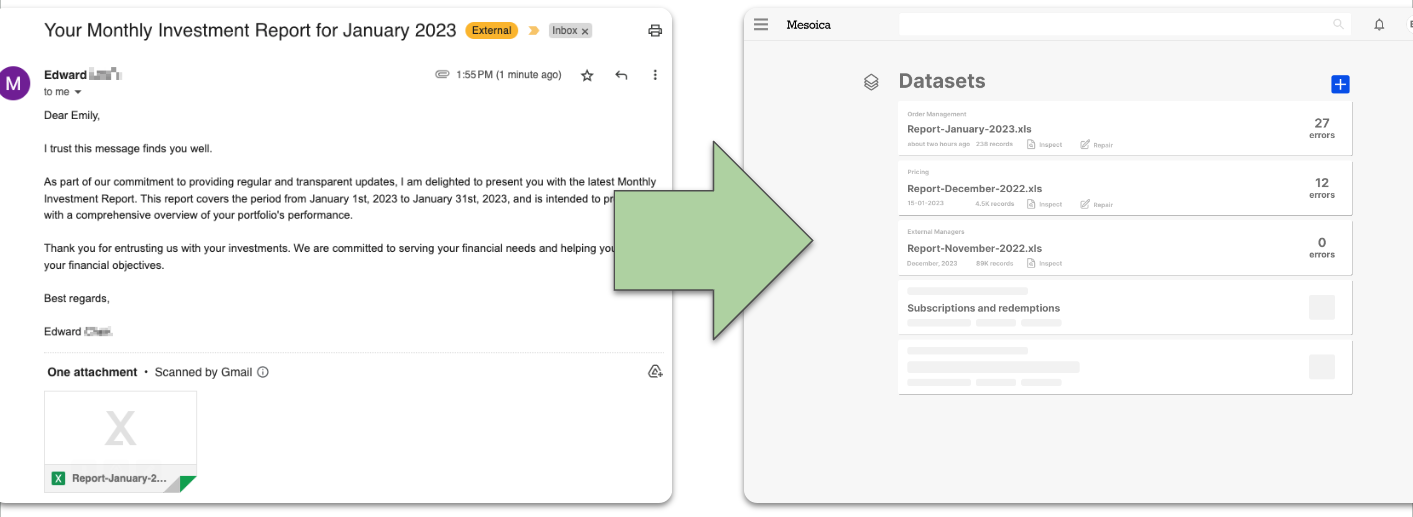
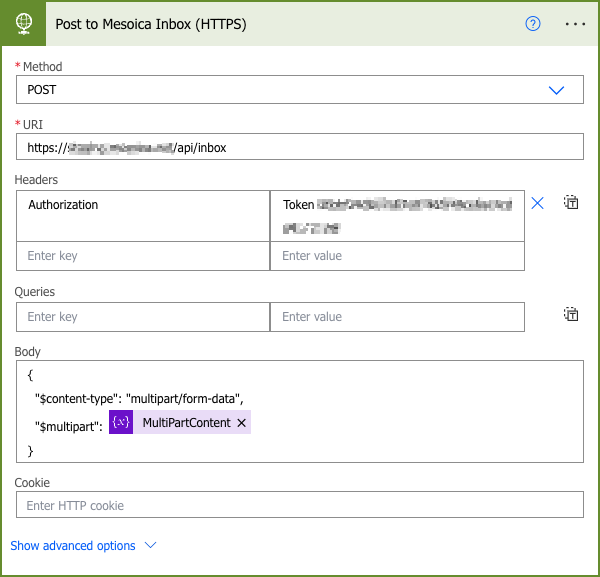
Post Attachments to Inbox API: Now, it's time to post the attachments to the Inbox API. This will create an actionable inbox item in the Mesoica platform. The data posted to the inbox can be processed according to any kind of workflow you deem fit.
That's it! You've just set up an automated data workflow that connects your mailbox to Power Automate and Mesoica. With this integration, you can now automatically extract data from your emails, perform robust data quality checks, and manage your data more efficiently.
If you have any questions or run into any issues while setting up this workflow, don't hesitate to reach out. We're here to help!
Benefits of Integrating Your Mailbox, Power Automate, and Mesoica
By this point, you've connected your mailbox to Power Automate and then to the Mesoica platform. Congratulations! You've just unlocked a powerful, efficient, and automated approach to managing your data. But what exactly does this integration bring to your data workflow? Let's dive into the benefits:
- Time Efficiency: The automation of data extraction and quality checks saves you countless hours spent on manual data processing. No more sifting through countless emails, downloading attachments, and running scripts or macros. The whole process is now automated, freeing up your time for more strategic tasks.
- Improved Data Quality: With Mesoica's automated checks, alerts, and reports, you can ensure the accuracy and reliability of your data. This leads to better decision-making, as you can trust that the data you're working with is clean and high-quality.
- Seamless Collaboration: Mesoica's Smart Data Inbox feature simplifies data sharing, collaboration, and feedback. This ensures seamless communication and coordination among your team and external parties, fostering a more collaborative data management environment.
- Proactive Issue Management: With Mesoica's centralized system for issue tracking, prioritization, and resolution, you can proactively address data quality problems. This not only ensures data integrity but also minimizes operational disruptions.
- Data Traceability: With the Datasets Archive feature, you can access and analyze your complete data collection with ease. This ensures data traceability and allows for historical analysis, giving you a comprehensive view of your data landscape.
By integrating your mailbox, Power Automate, and Mesoica, you're not just improving your data workflow - you're transforming it. You're moving away from tedious, manual processes and stepping into a world where data management is efficient, automated, and, dare we say, enjoyable.
Mesoica’s data quality platform is specifically designed to help LPs and GPs manage their data efficiently. By using our platform, you can seamlessly collect, validate, and monitor data, enhancing communication and collaboration. Our scalable solution adapts to your organization's growing data needs, providing peace of mind and enabling you to become a truly data-driven organization. Start your journey today by visiting our website or contacting us to learn more about how Mesoica can empower your firm to continuously improve data quality.